Tuesday, July 13, 2010

Baked Potato Pizza

I have been craving baked potato pizza every night. A local restaurant serves a small one as an appetizer but at $6, that could get pretty expensive!

Baked Potato Pizza

Pillsbury Thin Crust Pizza Dough
3 medium potatoes, baked and cooled
3 tablespoons butter, melted
1 teaspoon garlic powder
1 teaspoon dry Italian Seasoning
1/2 cup Sour Cream
1/2 cup Ranch Dressing
3 Green Onions, chopped
1 1/2 cups Mozzarella Cheese, shredded
1/2 cup Cheddar Cheese, shredded

Prepare crust according to package directions. Press dough into a lightly greased 14-in. pizza pan; build up edges slightly. Before adding toppings, bake at 400 degrees F for 5-6 minutes or until crust is firm and begins to brown. Adding - Pillsbury pizza crust rolls out in a rectangle, we shaped it into a circle to fit the pizza pan.

Cut potatoes into 1/2-in. cubes. In a bowl, combine butter, garlic powder and Italian seasoning. Add potatoes and toss. Mix Sour Cream and Ranch, spread over crust; top with potato mixture, bacon, onions and cheeses. Bake at 400 degrees F for 10 - 15 minutes or until cheese is lightly browned. Let stand for 5 minutes before cutting.

My notes - After putting the potatoes over the sour cream/ranch mixture, I sprinkled some bacon bits and onion over the potato before laying on the cheese. Then I put on a good amount of mozzarella, some cheddar, and then a good amount of bacon bits along with the rest of the onion. Then the rest of the cheese went on. You can use as much or as little as you like when it comes to the bacon bits, its all to taste! Next time I am going to try adding some broccoli and see how that turns out!

Saturday, May 8, 2010

TuTu Making

I have been so slacking in the blogging department! I haven't been all that motivated and now that Willow is moving around, forget about it.

In attempt to get things moving again I have gotten back into is tutu making! Well, I haven't really gotten back into yet, but i did make a tutu last night for Dakota, to wear to her ballet class. I am really proud of the way it come out!


Thursday, January 14, 2010

Bacon Wrapped Pork Chops

So being on this low-carb diet has really made me open my mind a bit to cooking. I can look what I have in the house and start putting together ingredients for a dish I have never had before. I am amazed by this since I have always been a horrible cook. Atleast I thought I was horrible, until I got brave and decided to actually try to cook. And even after many failures, I still kept trying, which is why I think I have become a decent cook!

That brings me to the next recipe to share, one that is SO EASY yet so delicious, you have to try it!


Bacon Wrapped Pork Chops

What You Need
4 Pork Chops, 1 inch
8 Slices of Bacon
Seasoning of Choice (I used Adobo and Thyme)
Salt
Pepper


Pre-heat the oven to 400 degrees. Take a 9 x 13 baking dish
and lightly spray it with cooking spray or coat with butter. Take each pork chop and wrap it with bacon. Each peice should use two peices of bacon. Place into the baking dish and top with salt and pepper to taste. Then use your favorite seasoning to your liking. Place in the oven for 30 minutes, then broil for about 5 minutes to make the bacon brown and crispy.

You can actually make as many pork chops as you like and use whatever thickness you like. If you use thinner chops then you may only need once peice of bacon. I just so happened to use 4 chops at 1 inch thickness so I needed 2 peices of bacon to cover the whole chop.

I actually made these for lunch and made a nice salad to go with it, topped with zesty italian dressing (picture above). If your tiredof dry pork chops, your going to love this recipe. They turn out juicy and flavorful! I am thinking about trying this with chicken!!

Chicken Teriyaki Crock Pot Recipe

I have owned a crock pot forever but never really used it. Now I have this sudden urge to make everything in it. I am seriously obsessed! I surf the internet all morning look for something I could make in my crock pot using what I have in the house.

So the other morning, after craving Chicken Teriyaki, I realized I did not have any Teriyaki sauce! So I decided to make my own! I read threw some recipes and put together my own... so here it is!


Chicken Teriyaki with Home-Made Teriyaki Sauce (Slow Cooker Recipe)

Chicken
1 1/2 - 2lbs chicken breast, cubed (or you can cut the breasts in halves)

Sauce
1/2 cup soy sauce
2 cups water
1 teaspoon ground ginger
1/2 teaspoon garlic powder
10 tablespoons brown sugar
3 tablespoons honey
4 tablespoons cornstarch
1/2 cup cold water (keep seperate from the other water)

For the Sauce: Mix all the ingredients together in a sauce pot except for the 1/2 cup of cold water and the 4 tablespoons of cornstarch. Start to heat up and stir occasionally.

In a seperate container, mix the cold water and the cornstarch until the constarch is completely disolved.

Add the cornstarch mixture to the rest of the ingredients in the sauce pan. Stir until desired thickness. If you over-thicken, just add water until desired consistancy!


For the Crock Pot: After cutting up the chicken into 1 inch by 1 inch cubes, or in halves, which ever you prefere, place into the crock pot. Pour Teriyaki Sauce into the crock pot and mix the chicken around until complete covered. Cook on High for 4 hours or Low for 7-8 hours.

This is so yummy! The picture above is what I created that evening, I chose a side of broccoli (I actually cooked it in some of the terriyaki sauce in the crockpot once the chicken was done), and a cup of rice.

A warning though, if you put any left over sauce in the fridge, it gets gooey and clumpy. I don't know if you are able to re-heat it to make it smooth again but I am wondering if maybe using flour instead of the cornstarch would change that? If anyone experiments with it, let me know!

Parsley and Garlic Chicken Recipe

I am yet again on a cooking rampage, trying new things, cooking food in a whole new way. With Nathan and I being on a new diet, I have to cook alot more than I am used to. The days of heating up a frozen pizza in the mirowave or throwing a hot pocket in there are OVER!

Here is a Recipe I want to share!! I found it on Linda's Low Carb Menus & Recipes. It orginally includes Carbalose flour but I omitted it due to not having any. And it was so delicious, there really is no need for it! This is also so quick and easy, it takes about 25 minutes from preparation to finish.


Chicken Breasts with Garlic and Parsley

3 boneless chicken breasts, cubed
1/2 teaspoon salt
1/2 teaspoon pepper
2 tablespoons oil
1 tablespoon garlic, minced
3 tablespoons fresh parsley, chopped
2 tablespoons butter

Cut chicken into cubes, toss with salt and pepper. Heat the oil in a large skillet over high heat. Cook the chicken 3 1/2 minutes, turning occasionally. Add the garlic, parsley and butter. Sauté 1 minute and stir to coat the chicken with the pan sauce.

The picture shown is my final product! I made a small salad, with just lettuce and cucumber and drizzled a light cesar dressing on top. It was delicious!
If anyone tries this recipe, I'd love some comments on how you liked it and what kind of changes you may have made to it.

Friday, May 8, 2009

Decorated Wall Letters!!

I got my nursery letters in the mail the other day and I was all prepared for them. I don't have the ribbon on them yet, so I will have to post when I actually get them hanging!

1) Painting the sides. I picked 4 different Craft Paints that matched the colors of the girls' room.


2) I traced the letters onto the scrapbook paper I wanted, put a coat of Mod Podge on the letter, stuck the paper to the letter, then used 2 coats of Mod Podge to seal.


3) I decorated!!! I used sparkly scrapbook embelishments.


And Dakota helped! Sort of!


Price?

Letters - $50 with shipping
Scrapbook Paper - $6
Embelishments - $8
Mod Podge - $8
Foam Brushes - $1
Ribbon - $10

Total - $83 and 5 hours of my time haha!

Wednesday, April 22, 2009

Re-Doing the Girls' Room

Ugh! I don't even want to think about it, it frustrates me so much. Trying to incorporate two children into one room, without spending a ton of money. Luckily I am having another girl, or else this would be much harder.

Dakota is so obsessed with the Disney Princesses, I would hate to choose princesses for the new baby's bedding but I do want them to match in some way! Then I have played with the idea of changing Dakota's bedding to match the bedding of the new baby, but I don't want Dakota to feel like we are changing her room around completely!

So, what do I do? I think about this every day and I usually stop thinking about it just because I can never come to a solid decision!

Here is what I have put together so far...

Dakota's current bedding and crib bedding choice?


So with that idea, I am basically sticking with pinks, yellow, blues, greens, and whites. I can decorate the walls however I want, flowers and princesses.

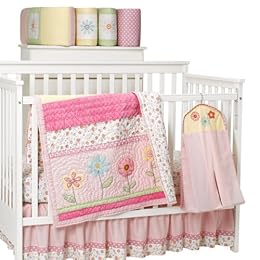
But I LOVE this bed set for the new baby! Which wouldn't match Dakota's current bedding what so ever! But possibly could replace her bedding with something that sort of matches?


Then you figure, that by just picking a bedding that matches Dakota's Princess bedding, it would be much cheaper! Luckily the walls are plain since we are renters and haven't decorated since we have moved here.

Now can you see why I can't think straight when I start to think about it? One the plus side though, a totally awesome mommy from JustMommies.com offered to make us ladies some nursery letters! I will get them in the mail shortly and I can't wait to start decorating them... but I need to know what bedding I am using first!!!


Any input on this whole room decorating this is greatly appreciated!!!